Printable Instructions For Vinyl Decal Wet Application
Preparation is Key
Applying vinyl decals can be a bit tricky, but with the right instructions, you can achieve professional-looking results. The wet application method is a popular choice among DIY enthusiasts and professionals alike, as it allows for a smooth and bubble-free installation. In this article, we will provide you with printable instructions for vinyl decal wet application, so you can get started on your project with confidence.
Before you begin, make sure you have all the necessary materials, including the vinyl decal, a clean and dry surface, a spray bottle with water, and a credit card or similar tool. It's also important to read the instructions carefully and understand the process before starting. This will help you avoid common mistakes and ensure a successful application.
Applying the Decal
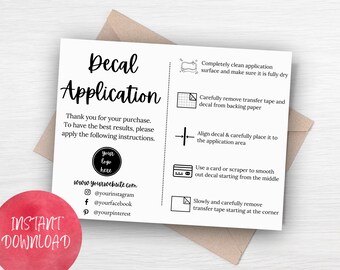
To start, clean the surface where you will be applying the decal, making sure it's free of dirt, dust, and other contaminants. Next, peel the backing paper off the decal and place it on the surface, aligning it with the desired position. Use a credit card or similar tool to smooth out any air bubbles or wrinkles, working from the center outwards. Then, use a spray bottle to apply a small amount of water to the decal, making sure it's evenly coated.
Now it's time to apply the decal. Use a credit card or similar tool to squeegee the decal onto the surface, starting from the center and working your way outwards. Make sure to apply even pressure and avoid applying too much pressure, which can cause air bubbles or wrinkles. Once the decal is applied, use a clean towel or cloth to wipe away any excess water and remove any air bubbles that may have formed. With these printable instructions for vinyl decal wet application, you'll be able to achieve professional-looking results and enjoy your new decal for years to come.